去年就买了一个阿里云服务器,自从安装了mySQL数据库也就没有去发挥它的作用了。一直也想将vue开发的一个小项目部署到服务器上,有助于以后写文章时有个链接能直接看到效果,而不是图片了。下面就记录一下nginx部署一个项目的流程。
直入主题
ubuntu安装nginx服务器
sudo apt-get install nginx
安装好的文件位置:
/usr/sbin/nginx:主程序
/etc/nginx:存放配置文件
/usr/share/nginx:存放静态文件
/var/log/nginx:存放日志
其实从上面的根目录文件夹可以知道,Linux系统的配置文件一般放在/etc,日志一般放在/var/log,运行的程序一般放在/usr/sbin或者/usr/bin。
当然,如果要更清楚Nginx的配置项放在什么地方,可以打开/etc/nginx/nginx.conf。
Nginx指定默认加载/etc/nginx/nginx.conf的配置文件。如果要查看加载的是哪个配置文件,可以用这个命令sudo nginx -t或者ps -ef | grep nginx。
然后通过这种方式安装的,会自动创建服务,会自动在/etc/init.d/nginx新建服务脚本,然后就可以使用sudo service nginx {start|stop|restart|reload|force-reload|status|configtest|rotate|upgrade}的命令启动。
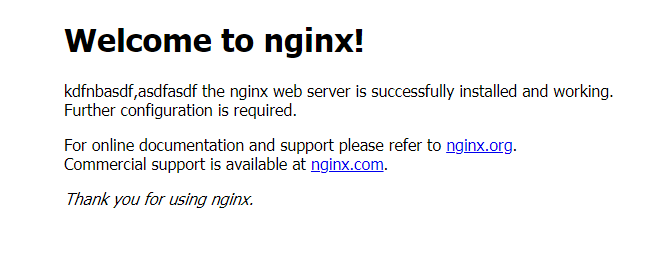
下面是被我修改过的页面。
vue-cli打包成静态文件
打包之前需要注意两个问题:
1.记得改一下config下面的index.js中bulid模块导出的路径。因为index.html里边的内容都是通过script标签引入的,而你的路径不对,打开肯定是空白的。先看一下默认的路径。assetsPublicPath默认的是 / 也就是根目录。而我们的index.html和static在同一级目录下面。所以要改为 ./。
2.src里边router/index.js路由配置里边默认模式是hash,如果你改成了history模式的话,打开也会是一片空白。所以改为hash或者直接把模式配置删除,让它默认的就行 。npm run build生成的dist文件先在本地看一下是否有效果然后上传到github上。
修改nginx的配置文件
查看nginx.conf1
2
3
4
5
6
7
8
9
10
11
12
13
14
15
16
17
18
19
20
21
22
23
24
25
26
27
28
29
30
31
32
33
34
35
36
37
38
39
40
41
42
43
44
45
46
47
48
49
50
51
52
53
54
55
56
57
58
59
60
61
62
63
64
65
66
67
68
69
70
71
72
73
74
75
76
77
78
79
80
81
82
83
84
85
86
87
88
89
90
91
92
93
94
95user www-data;
worker_processes 4;
pid /run/nginx.pid;
events {
worker_connections 768;
# multi_accept on;
}
http {
##
# Basic Settings
##
sendfile on;
tcp_nopush on;
tcp_nodelay on;
keepalive_timeout 65;
types_hash_max_size 2048;
# server_tokens off;
# server_names_hash_bucket_size 64;
# server_name_in_redirect off;
include /etc/nginx/mime.types;
default_type application/octet-stream;
##
# Logging Settings
##
access_log /var/log/nginx/access.log;
error_log /var/log/nginx/error.log;
##
# Gzip Settings
##
gzip on;
gzip_disable "msie6";
# gzip_vary on;
# gzip_proxied any;
# gzip_comp_level 6;
# gzip_buffers 16 8k;
# gzip_http_version 1.1;
# gzip_types text/plain text/css application/json application/x-javascript text/xml application/xml application/xml+rss text/javascript;
##
# nginx-naxsi config
##
# Uncomment it if you installed nginx-naxsi
##
#include /etc/nginx/naxsi_core.rules;
##
# nginx-passenger config
##
# Uncomment it if you installed nginx-passenger
##
#passenger_root /usr;
#passenger_ruby /usr/bin/ruby;
##
# Virtual Host Configs
##
include /etc/nginx/conf.d/*.conf;
include /etc/nginx/sites-enabled/*;
}
#mail {
# # See sample authentication script at:
# # http://wiki.nginx.org/ImapAuthenticateWithApachePhpScript
#
# # auth_http localhost/auth.php;
# # pop3_capabilities "TOP" "USER";
# # imap_capabilities "IMAP4rev1" "UIDPLUS";
#
# server {
# listen localhost:110;
# protocol pop3;
# proxy on;
# }
#
# server {
# listen localhost:143;
# protocol imap;
# proxy on;
# }
#}
上面的文件重点就在这两句include /etc/nginx/conf.d/*.conf;include /etc/nginx/sites-enabled/*;
第二句里面放着默认配置default1
2
3
4
5
6
7
8
9
10
11
12
13
14
15
16
17
18server {
listen 80 default_server;
listen [::]:80 default_server ipv6only=on;
root /usr/share/nginx/html;
index index.html index.htm;
# Make site accessible from http://localhost/
server_name localhost;
location / {
# First attempt to serve request as file, then
# as directory, then fall back to displaying a 404.
try_files $uri $uri/ =404;
# Uncomment to enable naxsi on this location
# include /etc/nginx/naxsi.rules
}
}
第一句文件的位置就是放自己配置的server。
先将github上的打包的dist文件拉动服务器上来。
放到下面的位置
root@iZi2m69ympwtuqZ:/var/www/dist# pwd
/var/www/dist
root@iZi2m69ympwtuqZ:/var/www/dist# ls
index.html README.md static
然后在/etc/nginx/conf.d 新建一个以。conf结尾文件
root@iZi2m69ympwtuqZ:/etc/nginx/conf.d# vi vueapp.conf
具体内容1
2
3
4
5
6
7
8
9
10
11
12
13
14
15
16
17
upstream arcgis_server {
        server demo-dx.geostar.com.cn:6234;
    }
server{
        listen 8081; #监听端口
        server_name 39.109.100.163;#监听地址
        location /{
                index index.html; #默认页面
                root /var/www/dist;#根目录,也就是github拉下来文件的位置
        }
        # 配置一个代理
        location /arcgis/ {
            proxy_pass http://arcgis_server;
        }

}
我也就是配置最最简单的。更详细配置查看官网
重启 nginx服务
nginx -s reload
然后访问测试去吧
nuxt项目部署流程
搭建nginx+node+npm+pm2环境
先在ubuntu上安装node环境。curl -sL https://deb.nodesource.com/setup_8.x | sudo -E bash -sudo apt-get install -y nodejs
查看node和npm版本nodejs -vnpm -version
nuxt项目打包上传
查看packpage.json1
2
3
4
5
6
7
8"scripts": {
"dev": "nuxt",
"build": "nuxt build",
"start": "nuxt start",
"generate": "nuxt generate",
"lint": "eslint --ext .js,.vue --ignore-path .gitignore .",
"precommit": "npm run lint"
}
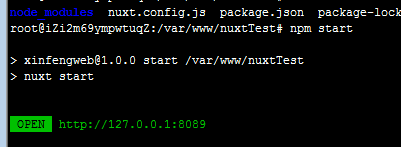
执行npm run build 生成.nuxt渲染文件。npm start本地是否正常运行。
将项目中的.nuxt、static、nuxt.config.js、package.json四个文件上传到仓库。
pm2运行项目
安装pm2:npm install pm2 -g。
pm2常用命令1
2
3
4
5
6
7
8
9
10
11
12
13
14
15
16
17启动:
pm2 start app.js
pm2 start app.js --name my-api #my-api为PM2进程名称
pm2 start app.js -i 0 #根据CPU核数启动进程个数
pm2 start app.js --watch #实时监控app.js的方式启动,当app.js文件有变动时,pm2会自动reload
查看进程:
pm2 list
pm2 show 0 或者 # pm2 info 0 #查看进程详细信息,0为PM2进程id
停止进程:
pm2 stop all #停止PM2列表中所有的进程
pm2 stop 0 #停止PM2列表中进程为0的进程
重启:
pm2 restart all #重启PM2列表中所有的进程
pm2 restart 0 #重启PM2列表中进程为0的进程
删除PM2进程:
pm2 delete 0 #删除PM2列表中进程为0的进程
pm2 delete all #删除PM2列表中所有的进程
在ubuntu上把仓库中文件clone下来。
安装依赖:npm install。启动:npm start
pm2启动:
pm2 start npm --name "my-nuxt" -- run start
ningx将pm2中运行的项目转发出去。
在nginx的配置目录下新建一个nuxt.conf文件1
2
3
4
5
6
7
8
9
10
11
12
13
14
15
16
17
18upstream nodenuxt {
server 127.0.0.1:8089; #nuxt项目 监听端口
keepalive 64;
}
server {
listen 8090; #你需要访问的端口
server_name 39.108.100.163;
location / {
proxy_http_version 1.1;
proxy_set_header Upgrade $http_upgrade;
proxy_set_header Connection "upgrade";
proxy_set_header Host $host;
proxy_set_header X-Nginx-Proxy true;
proxy_cache_bypass $http_upgrade;
proxy_pass http://nodenuxt; #反向代理
}
}
重启nginx:nginx -s reload
http://39.108.100.163:8090
这个项目目前还在开发中。后期会可能会正式上线。